|
Have you ever seen gel candles and been amazed at the way the bubbles reflect the light in their clear, water-like surroundings? Never do they look more impressive than in a beer candle. They are a lot of fun to create.
You will need:
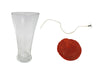 Beer glass, wick and colour tabs Beer glass, wick and colour tabs
|
Measuring the height of your glass and add on 5cm. Cut your wick to this length with sharp scissors.
Thread the wick through the wick tab and crimp tightly with pliers at the top of the neck. Adhere the wick tab to the bottom of the glass with a wick stickem. Push down firmly with a skewer or pen carcass (thread the wick through the centre). Place the top of the wick through the wick holder and attache a clothes peg to keep it straight and tight.
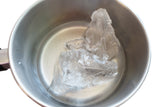 Melt gel over low direct heat Melt gel over low direct heat
|
Find the capacity of your glass. Weigh the empty glass, tare the scales, fill with water and read the new information to get your capacity.
Multiply this number by 80% to get your gel needs. (eg. 350g x 80% = 280gm). The other 20% will be used later.
Melt this weight of gel wax over a low direct heat until melted.
Using a vegetable peeler or back of a butter knife scrape a little of the brown colour tab into the gel (and I do mean a little). Add a little orange colour tab the same way and mix. Adjust the colour according to the beverage you are trying to match. A demonstration beer is often handy to get the colour right.
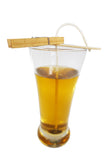 Pour your coloured gel to the height you think is right. Remember to leave room for the beer head. Allow the gel to set up and cool completely. Allow gel to set up completely before proceeding Pour your coloured gel to the height you think is right. Remember to leave room for the beer head. Allow the gel to set up and cool completely. Allow gel to set up completely before proceeding
|
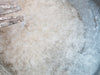 Weigh out 20% of the capacity of your glass (use the information you got previously to get this number - eg 20% x 350gm =70gm) of paraffin wax. In another saucepan melt the paraffin to a liquid, and turn off the heat. Allow the wax to cool. a little. Add 10% of the weight of your wax (eg 70gm x 10% = 7gm) in fragrance and mix well. Allow to cool more, and as it does so a white film will begin to form on the outside of the pan and across the surface of the wax. Weigh out 20% of the capacity of your glass (use the information you got previously to get this number - eg 20% x 350gm =70gm) of paraffin wax. In another saucepan melt the paraffin to a liquid, and turn off the heat. Allow the wax to cool. a little. Add 10% of the weight of your wax (eg 70gm x 10% = 7gm) in fragrance and mix well. Allow to cool more, and as it does so a white film will begin to form on the outside of the pan and across the surface of the wax.
|
|
 Using your worst kitchen fork whip the wax gently to break up the film and mix it through the wax that is still liquid. In time it will all become white and lumpy with a little liquid remaining. Now is the time to start building your "head". Take off the wick holder and be prepared to rearrange the wick to ensure you get an even wax fill. Using your fork gently lift some of the wax and place around the wick and the sides of the glass. Continue building the head by arranging the wax where it is aesthetically pleasing and ensure the finished build is symmetrical. Allow to set up completely Using your worst kitchen fork whip the wax gently to break up the film and mix it through the wax that is still liquid. In time it will all become white and lumpy with a little liquid remaining. Now is the time to start building your "head". Take off the wick holder and be prepared to rearrange the wick to ensure you get an even wax fill. Using your fork gently lift some of the wax and place around the wick and the sides of the glass. Continue building the head by arranging the wax where it is aesthetically pleasing and ensure the finished build is symmetrical. Allow to set up completely
 
|
Trim the wick to approximately 1cm in length. place a candle warning label on the base of the glass and step back to admire your creation. Allow wax to cure for 24 hours before lighting.
|
|
|

 Beer glass, wick and colour tabs
 Melt gel over low direct heat
 Pour your coloured gel to the height you think is right. Remember to leave room for the beer head. Allow the gel to set up and cool completely. Allow gel to set up completely before proceeding
 Weigh out 20% of the capacity of your glass (use the information you got previously to get this number - eg 20% x 350gm =70gm) of paraffin wax. In another saucepan melt the paraffin to a liquid, and turn off the heat. Allow the wax to cool. a little. Add 10% of the weight of your wax (eg 70gm x 10% = 7gm) in fragrance and mix well. Allow to cool more, and as it does so a white film will begin to form on the outside of the pan and across the surface of the wax.
 Using your worst kitchen fork whip the wax gently to break up the film and mix it through the wax that is still liquid. In time it will all become white and lumpy with a little liquid remaining. Now is the time to start building your "head". Take off the wick holder and be prepared to rearrange the wick to ensure you get an even wax fill. Using your fork gently lift some of the wax and place around the wick and the sides of the glass. Continue building the head by arranging the wax where it is aesthetically pleasing and ensure the finished build is symmetrical. Allow to set up completely

2 comments
So glad you were able to use this to make your own awesome beer candles :-)
Absolutely love this beer candle and I made some myself for Father’s Day they turned out great just like the real thing !
Thank you so much for the easy step by step instructions